
A (not so) short story on getting decent internet access
This is a tale of trial, tribulation, and triumph. It is the story of how I overcame obstacles including an inconveniently placed grove of eucalyptus trees, armed with little more than a broom and a pair of borrowed binoculars, to establish a stable internet connection.
I am a remote worker and accessibility to stable internet ranks right up there with food and shelter. With the rise of digital nomads and distributed companies, I am sure many of you can identify with the frustration of nonexistent or slow internet. Read on to learn more than you ever thought you would about how to MacGyver your very own homemade fiber to the home (FTTH) connection.
Searching for a connection
This adventure took place in September 2015. My wife and I decided to move from Montevideo, Uruguay to our hometown Durazno. We bought a cozy house on the outskirts of the city, about 3 km away from the downtown.
The first thing we checked was availability to our main ISP, Antel. They had 2 options:
- Fiber to the home (FTTH)
- Mobile access (LTE)
I walked around the area in an attempt to find a Network Access Point (NAP). The NAP is a part of the ISPs infrastructure and the presence of one indicates that the zone is covered with FTTH. I know how NAPs look, specifically the ones used by Antel, so it was a fast way to determine if I would have access to FTTH coverage. To my surprise I was unable to find one and confirmed via their map that there were none available.
Copper lines were also a bust because my house was too far from the closest node. Besides, the speed was close to a 56K dial-up modem and there were many disconnection issues. My neighbour had the same service and cancelled it. He said it was useless and had trouble despite only using it for email and day-today web access.
I then bought a dongle and tested Antel’s LTE/4G service with both my laptop and smartphone. The results were appalling. The upload speed was 128-256Kbps and was by far the biggest let down.
3G coverage was also terrible and I experienced many disconnections. This put mobile technology off the table.
In case you care to see details, here are the speed tests I performed onsite.
Challenge accepted
I looked deeper into Antel's FTTH deployed zone and saw that it was only 1.5km away in a straight line. I figured it was worth a shot to try creating a wireless Point-to-Point link.
Planning the link
Point-to-Point Link Requirements
Line of Sight: I needed to put the 2 radios in a place where they could see each other. Since I was going to use an unlicensed frequency (2.4Ghz or 5Ghz), this was a difficult requirement.
The second necessity was determining the Fresnel Zone clearance. Basically you need to have the two radios high enough that you can avoid interference and poor link quality.
Point-to-Point Link Issues
The most destructive force for radio electrical signals is water (radio signals just don’t get through easily or at all) and trees are full of water. I realized that the Eucalyptus grove (labeled Major issue in the image below) was right in the path of the signal path. Diving into Google Earth and Google Maps gave me some insight on dodging eucalyptus forest and other troublesome surface heights. I then stood on the roof of my house with some borrowed binoculars to help determine a placement for the remote endpoint.
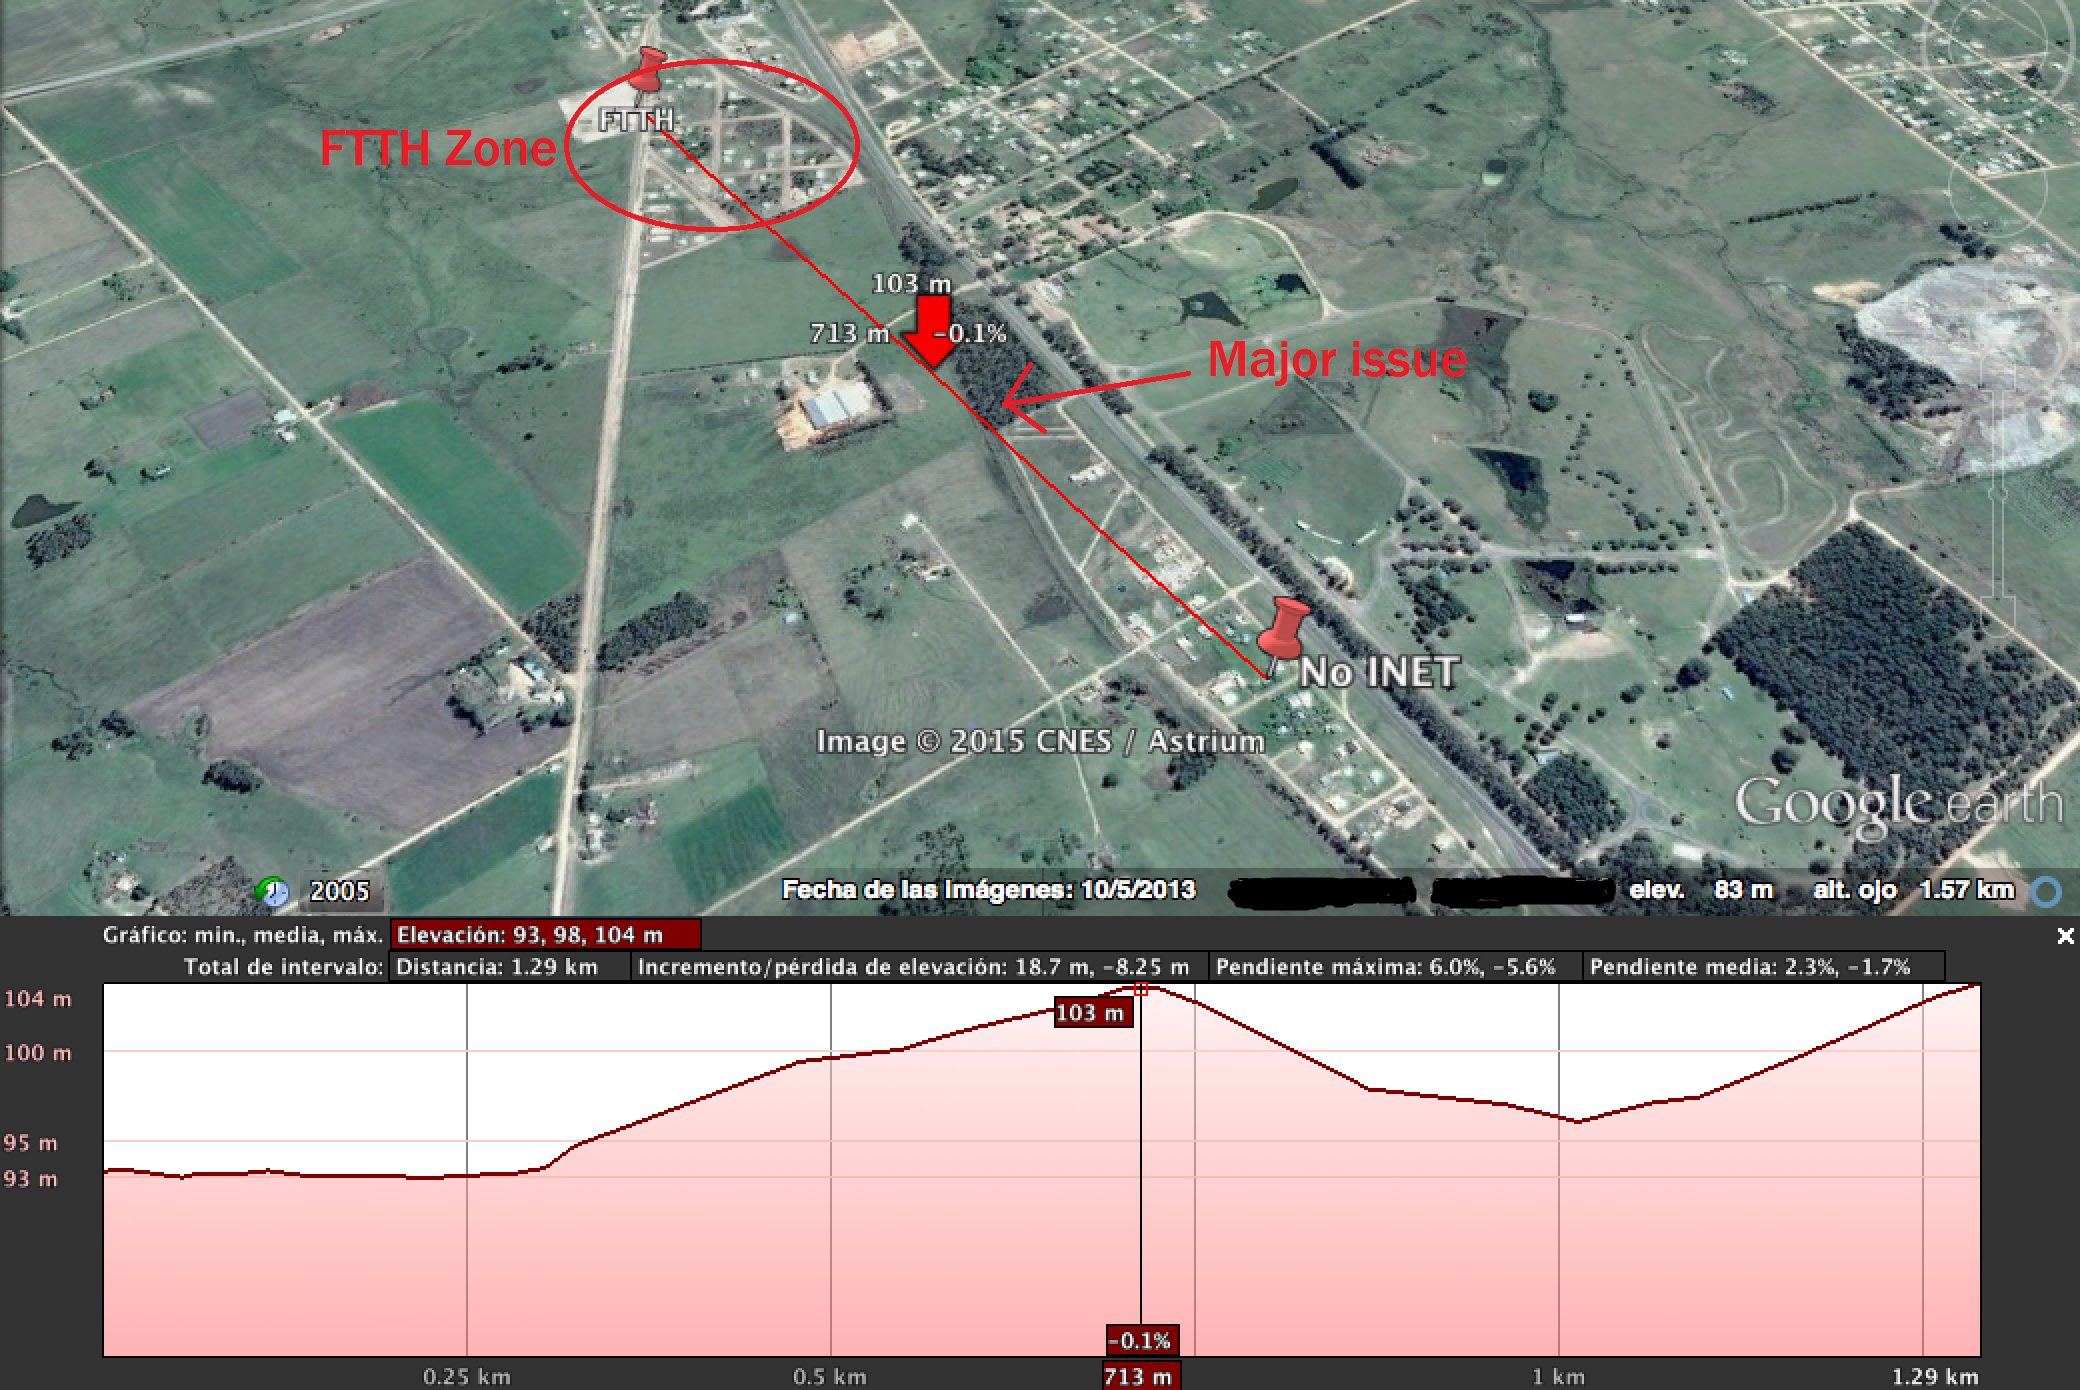
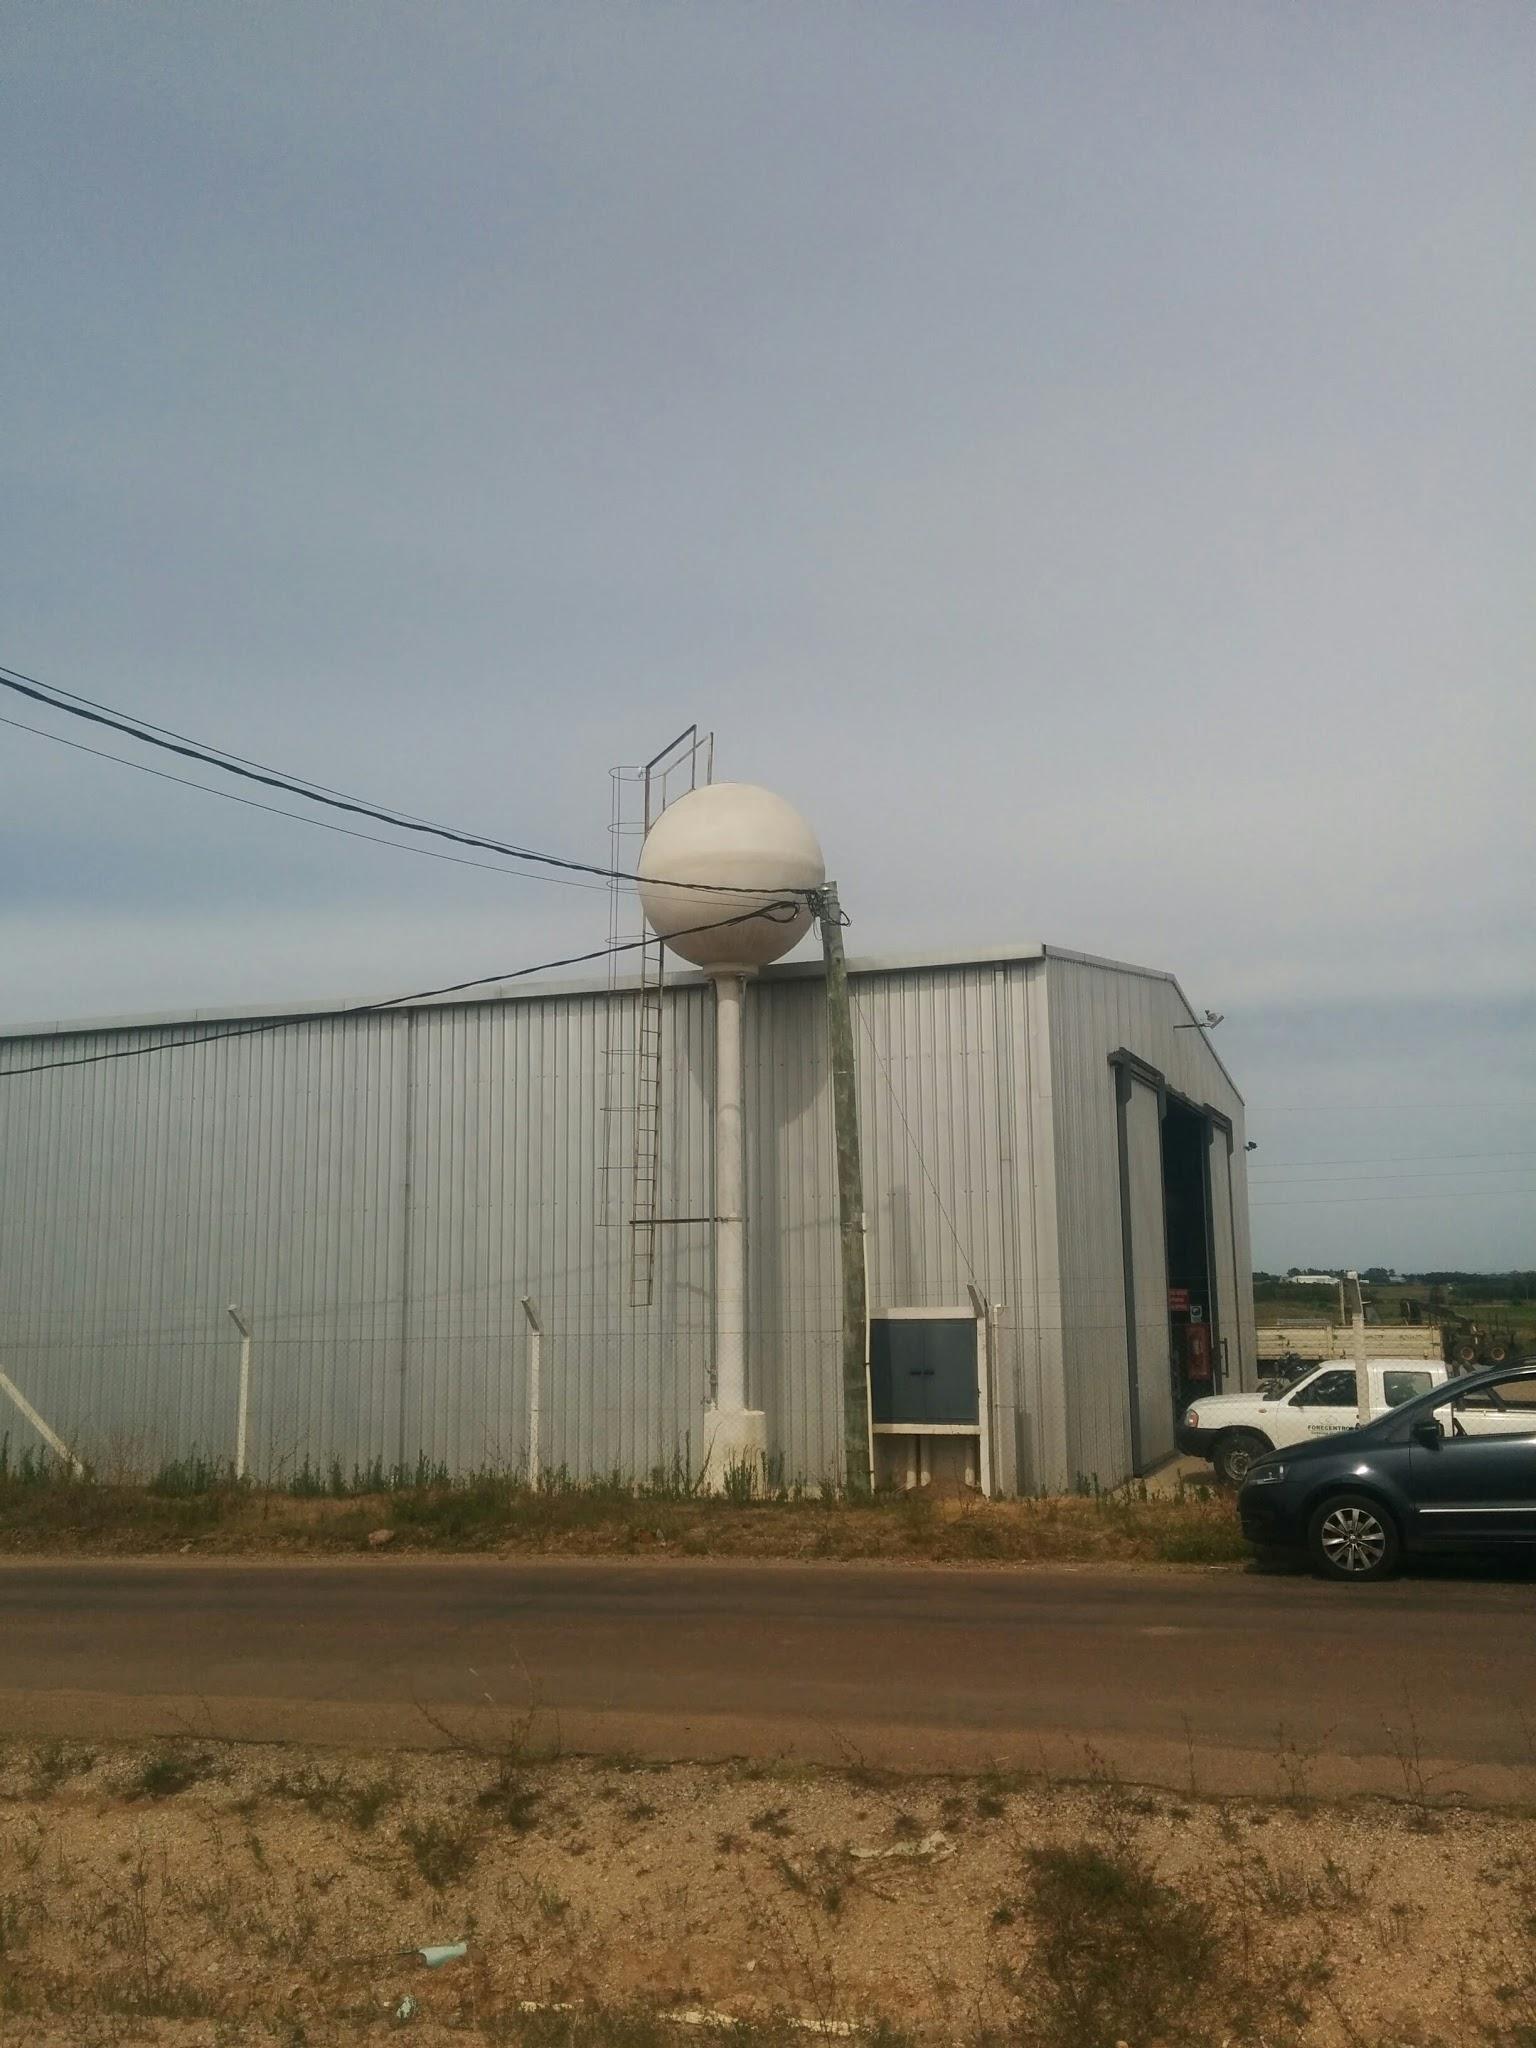
Through the binoculars, I spotted a white balloon that looked like some kind of tank in the FTTH zone. I drove up and realized that it was a water tank situated near a large warehouse for trucks. It made sense to put the radio on top of this tank to benefit from its height (labeled "FTTH" in the image above) for the Fresnel Zone clearance.
I rang up the owner and arranged a meeting with him to explain the situation. I found it difficult to explain what I needed and he had no idea what I was talking about, so he took some convincing.
The owner’s main concern was that I may interfere with his internet access. I reassured him and explained that I would be using a service different to the one he was using. He had nothing to worry about as I only needed the height of his tower.
He agreed and let me perform some tests to check the viability of my plan.
The Parameters
Google Earth revealed:
- 93m of surface height at the tank + 7m for the height of the tower (labeled "FTTH") = 100m
- My house was 104m (labeled "No INET" in Google Earth picture) + 4m for my house’s small warehouse that would store the radio = 108m
The major concern was that at halfway point, the surface height of the land was 103m and I needed at least 4.4m of Fresnel zone clearance = 107.4m
There was nothing I could do to boost the height of the tank, so I had to hope for the best and test out the connection.
Testing the connection
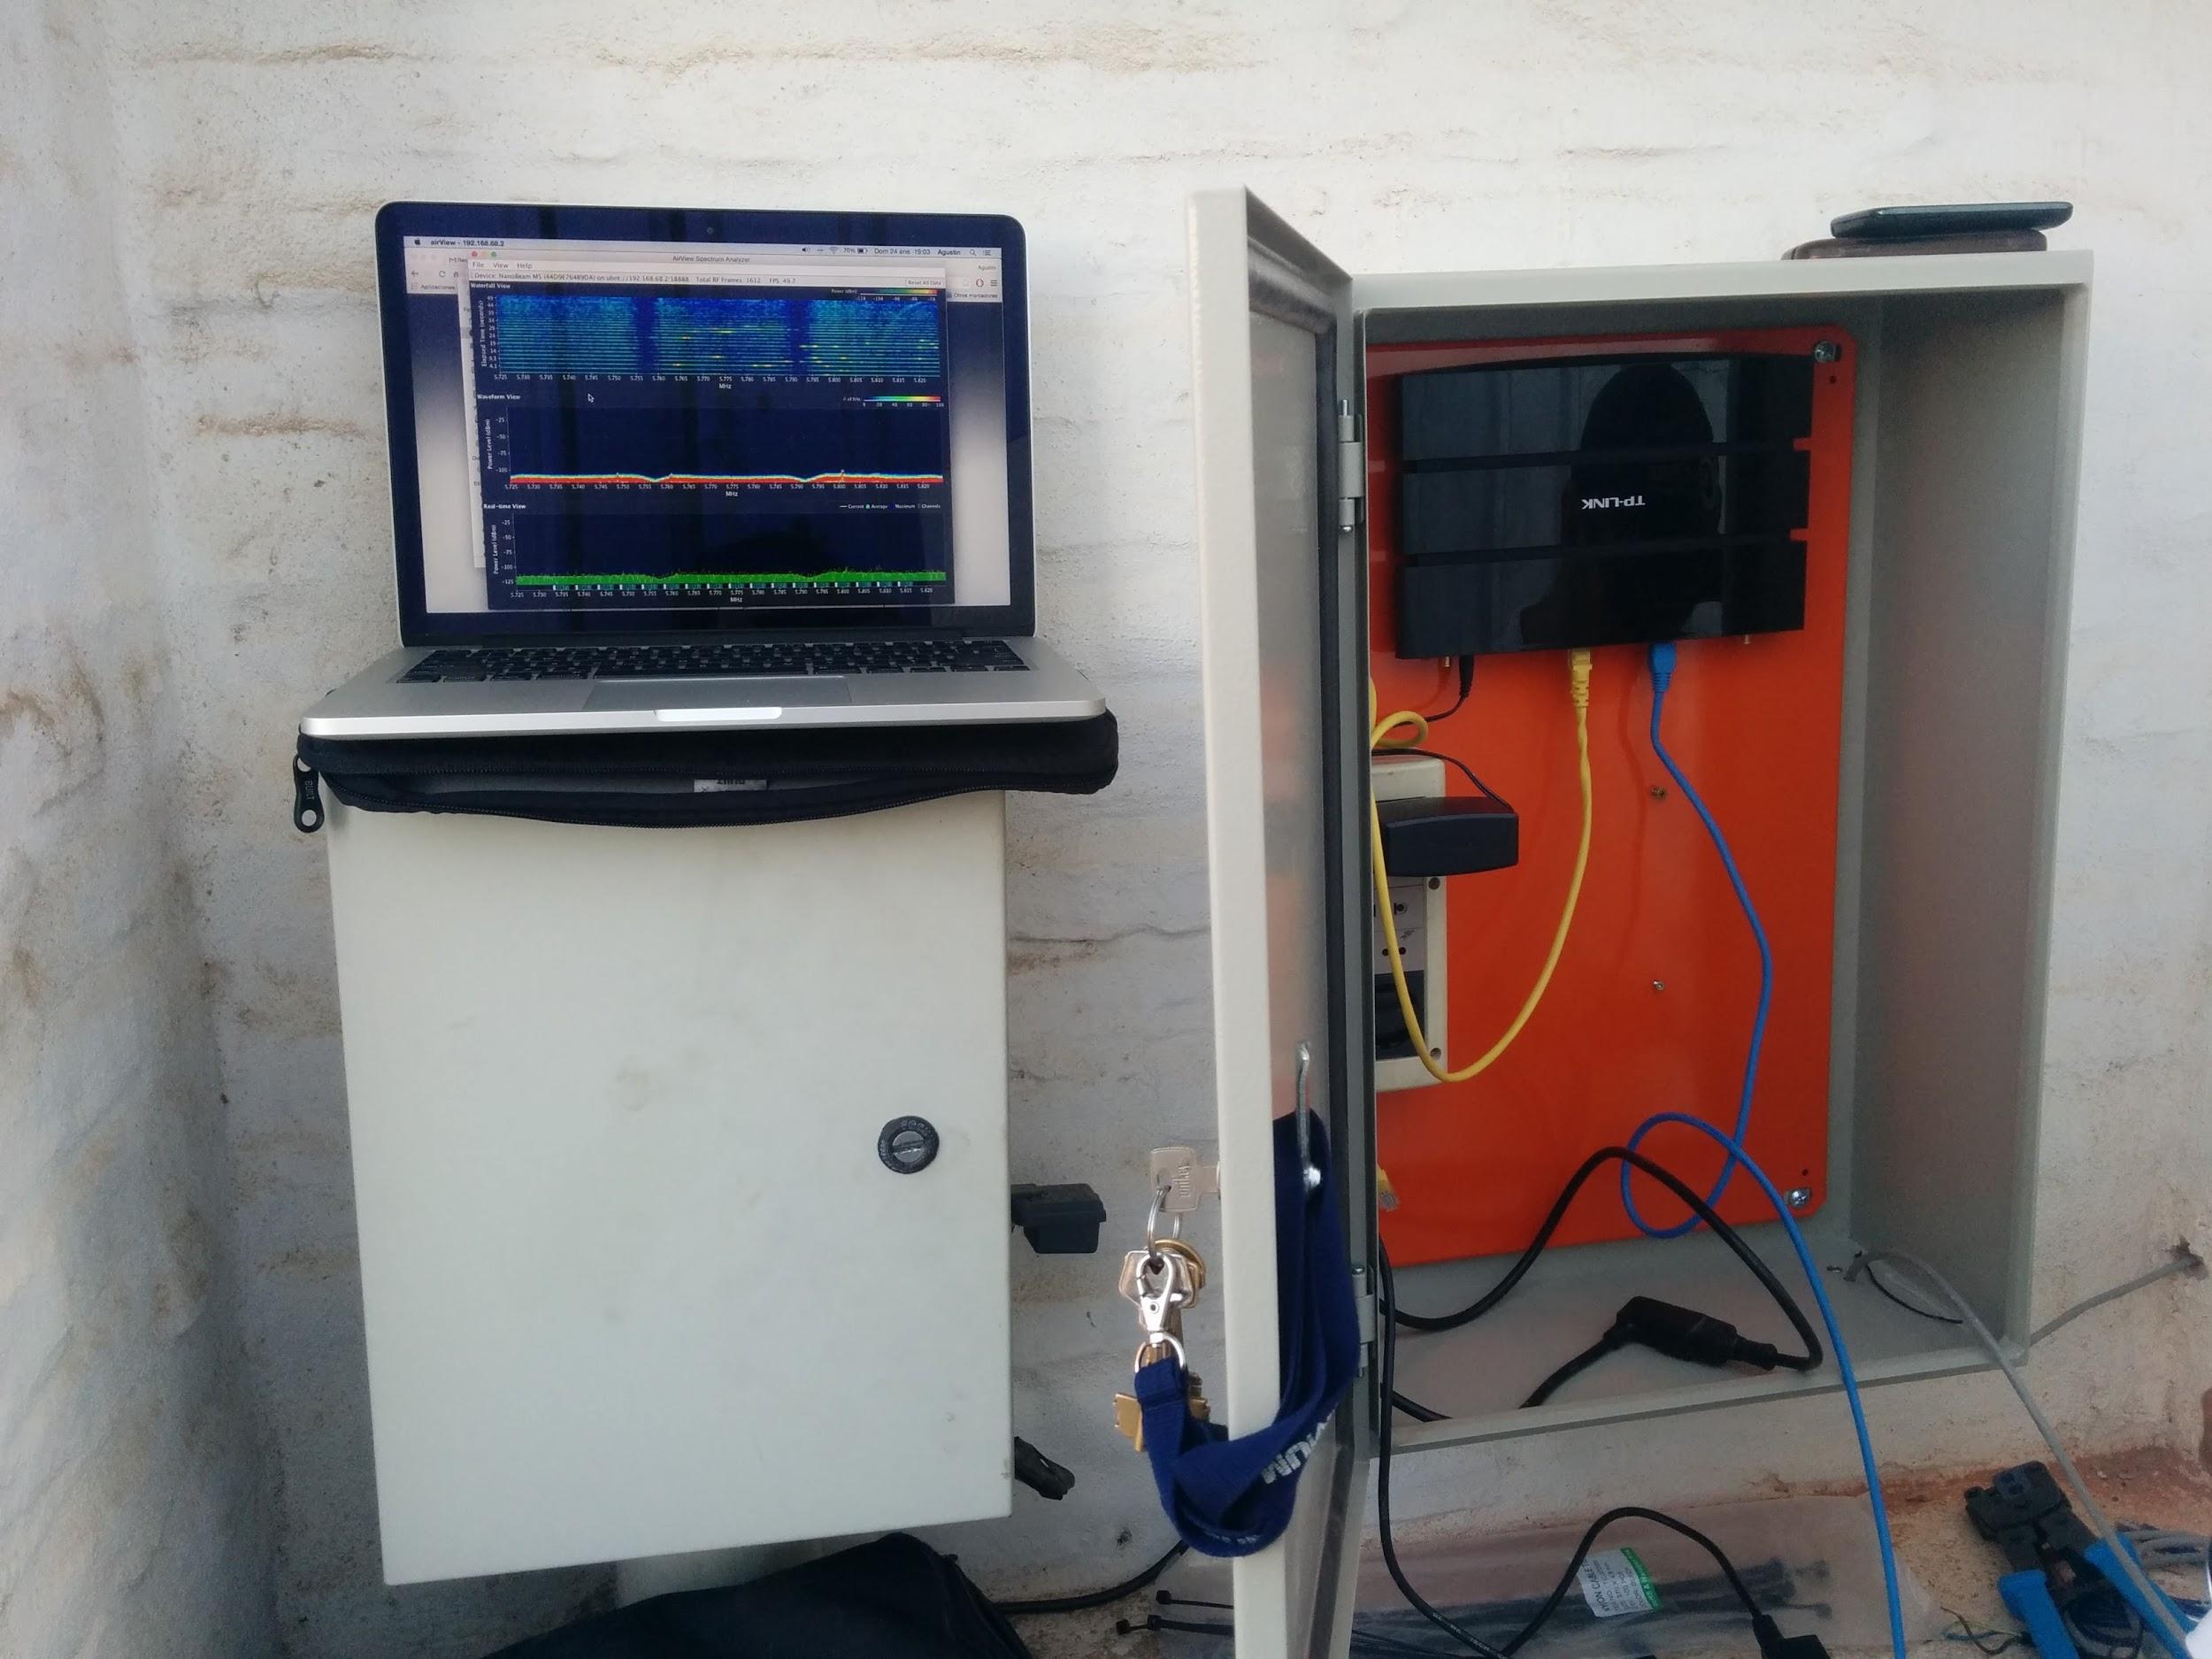
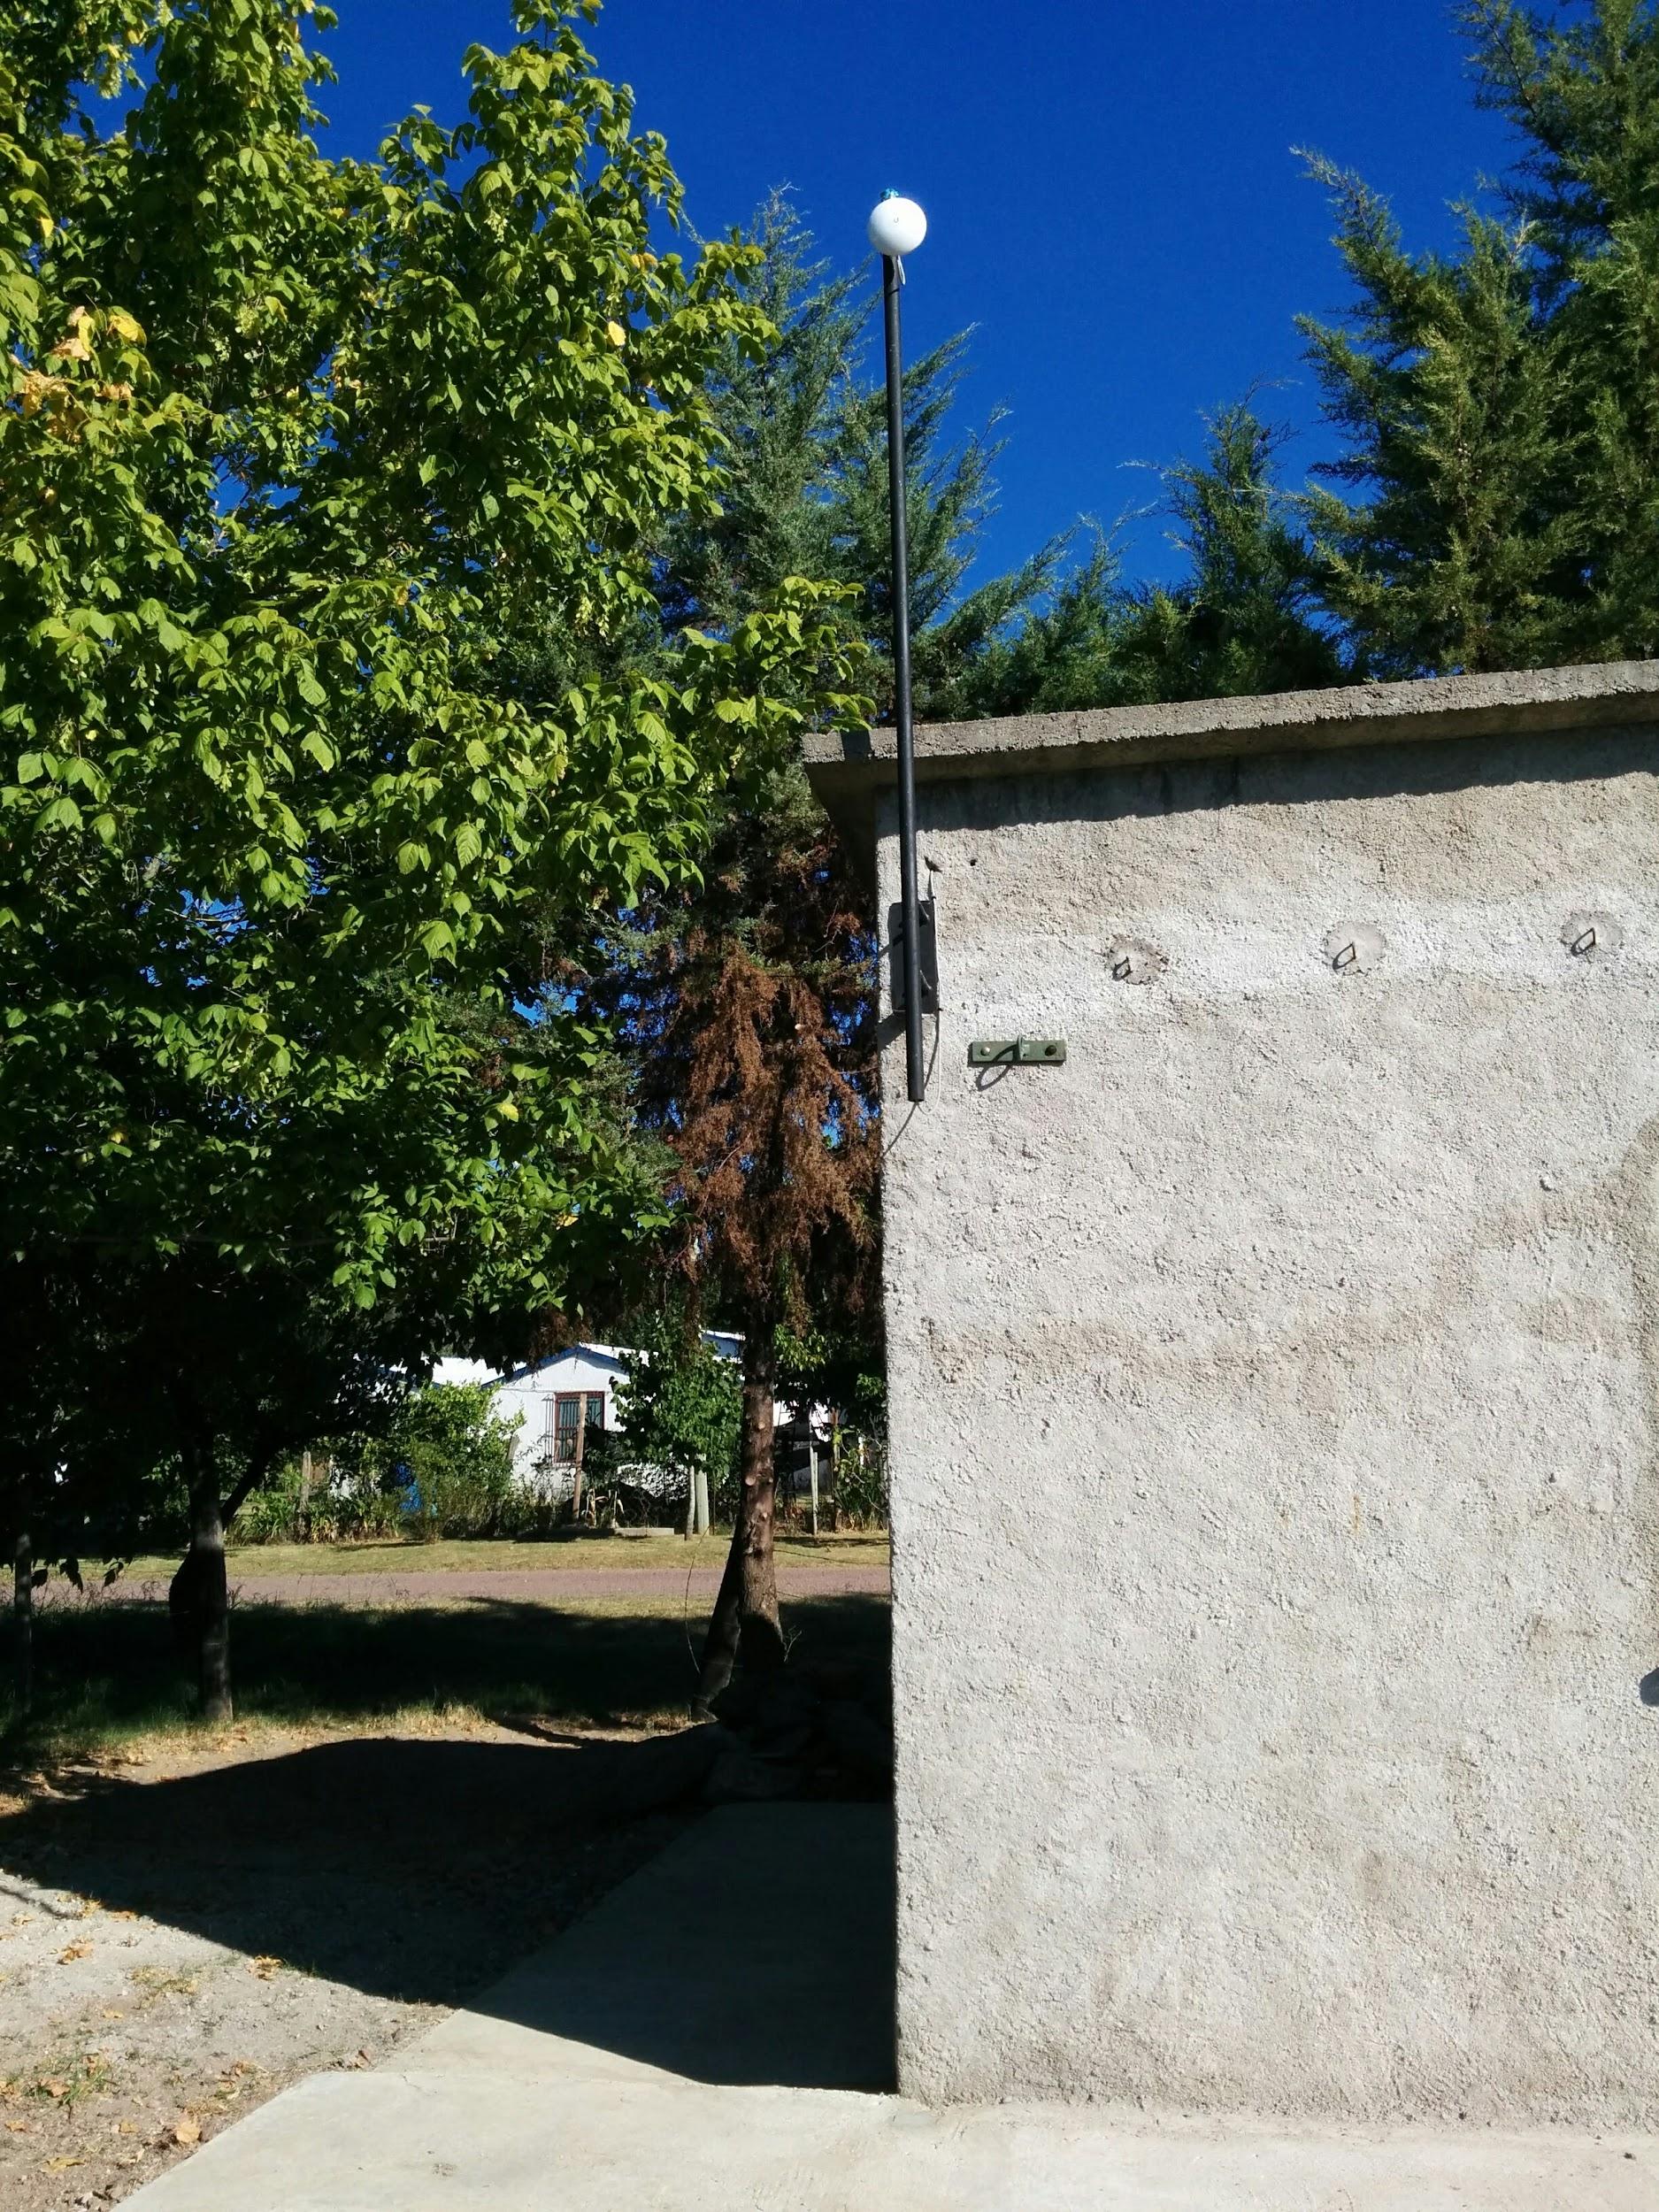
I borrowed 2 Ubiquiti NanoStation Loco M5s (5Ghz band) to test the link. I knew that if I could establish a link with these smaller capacity devices, then I was on the right track.
At the FTTH point (the water tank) I placed a Nano.
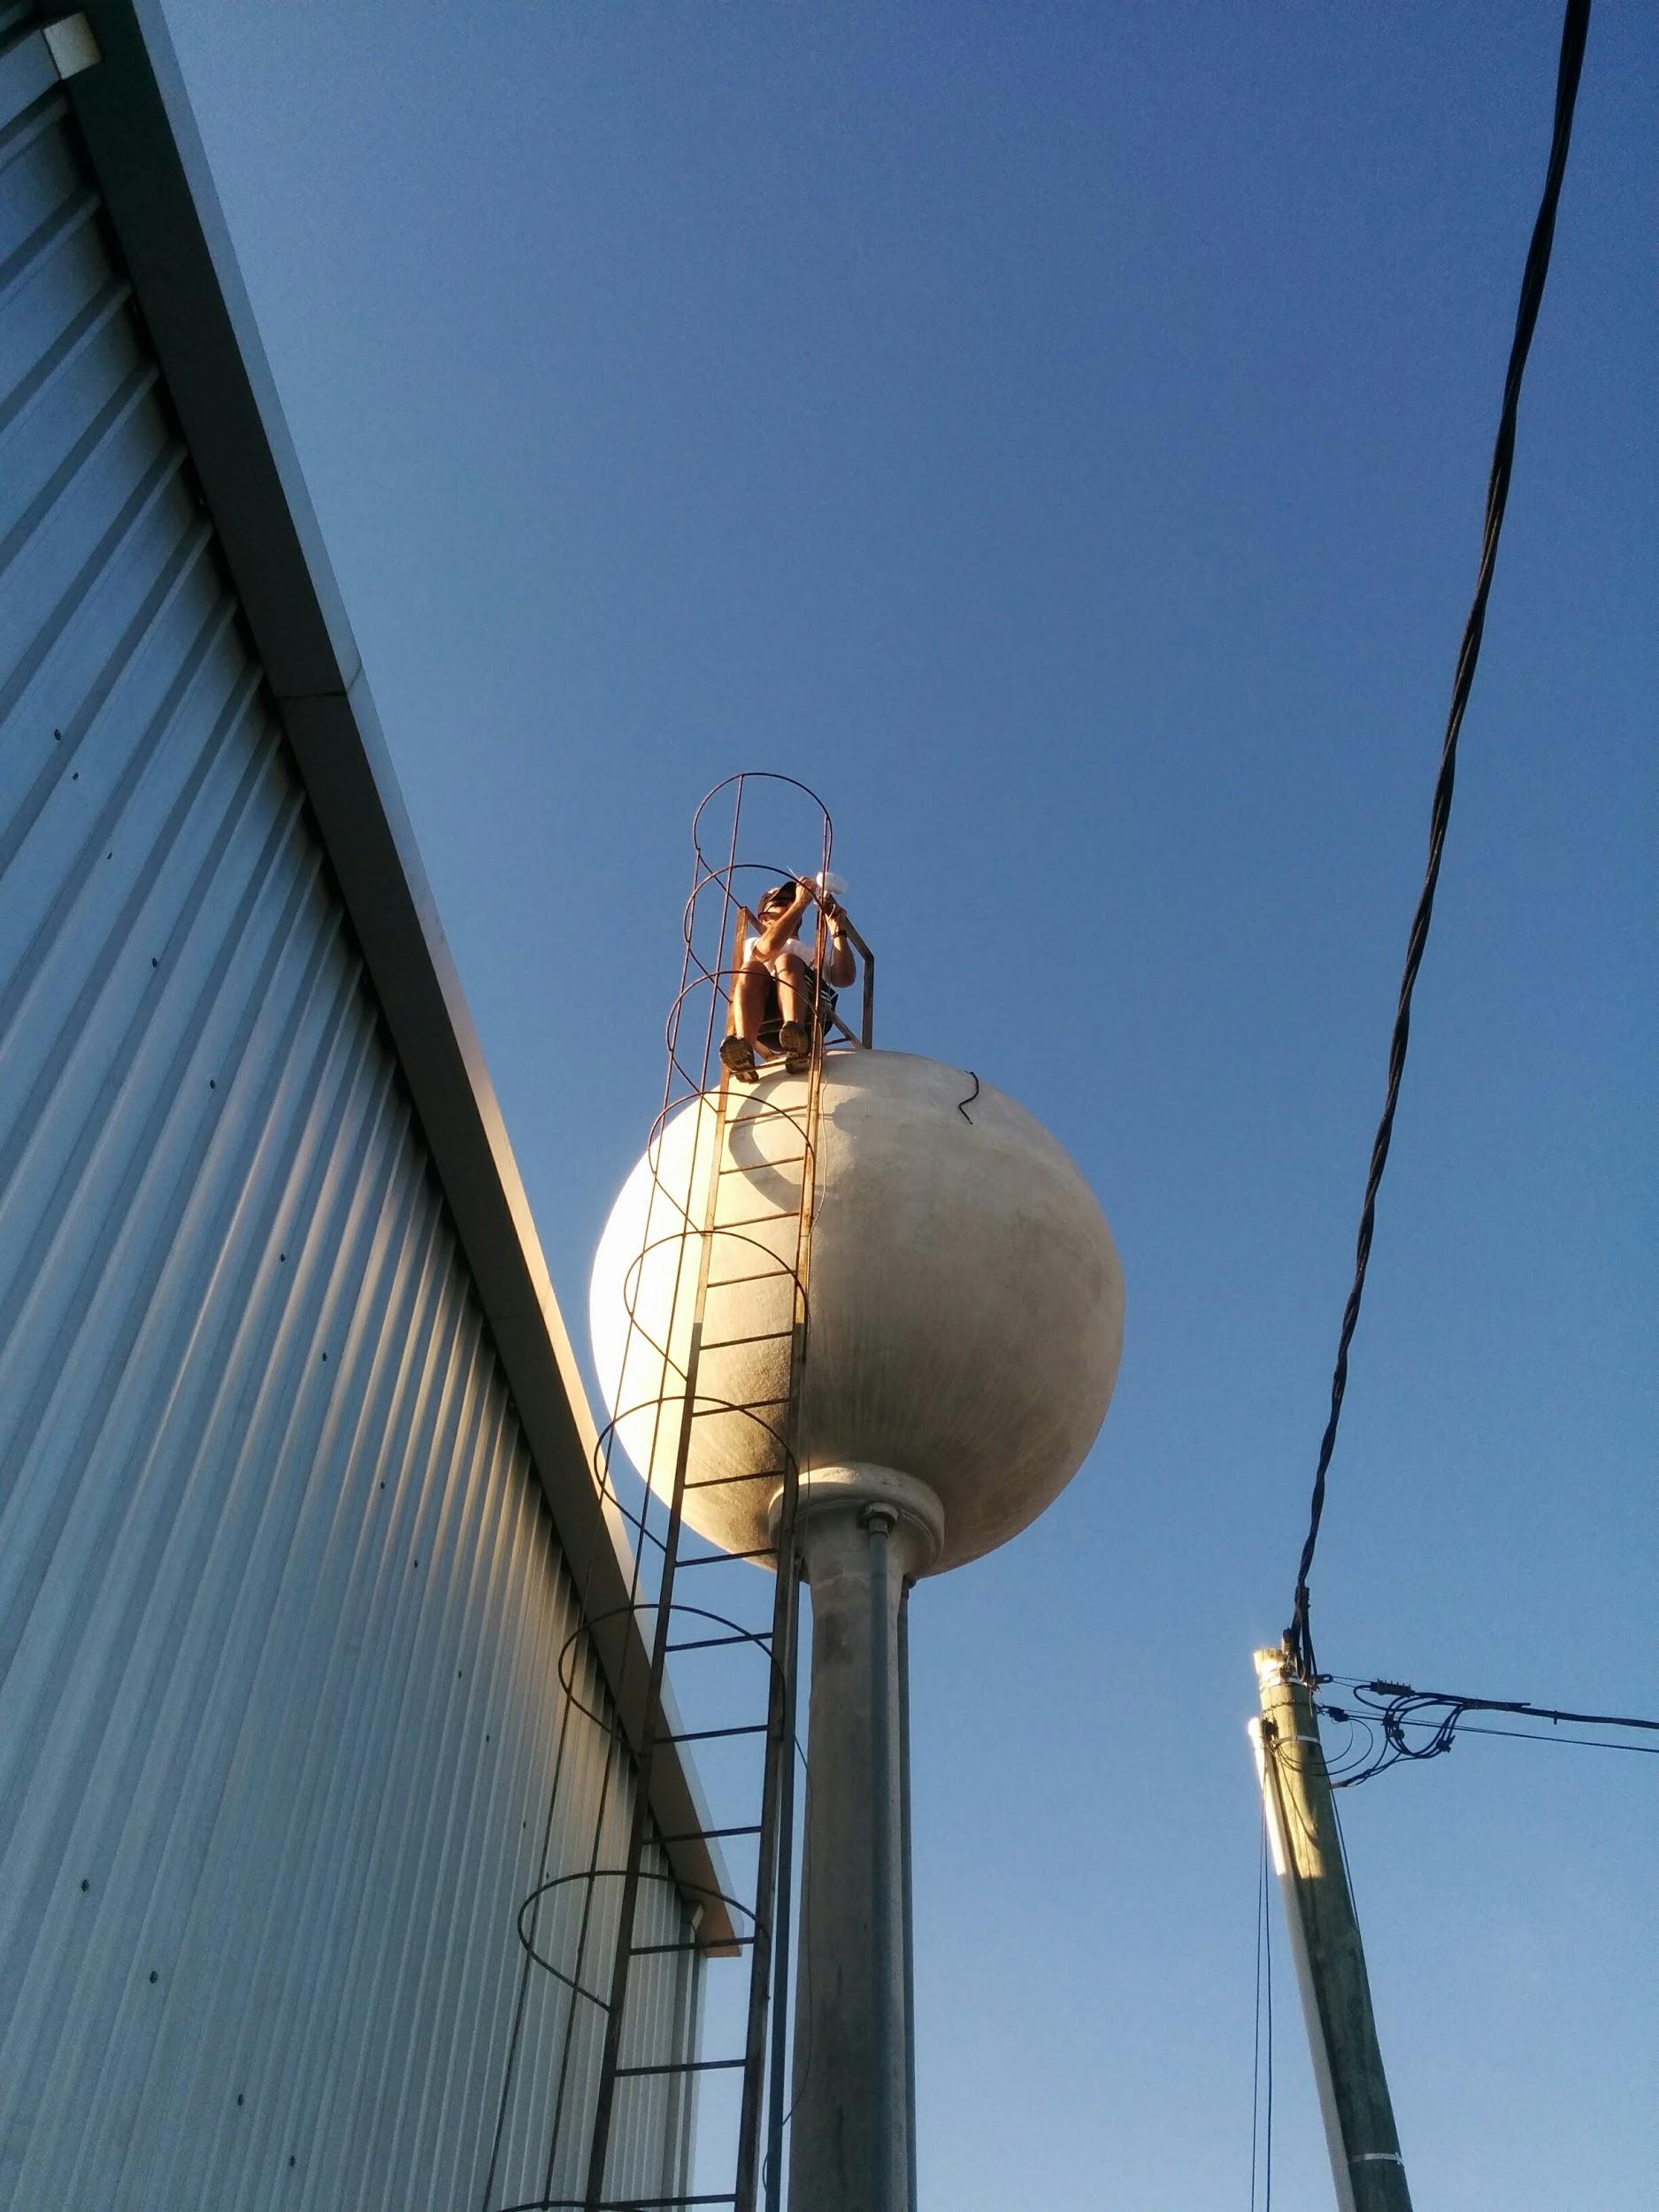
I put the other one onto a broomstick. I then wandered around my property (including the roof of the house and the warehouse) with this makeshift aligning tool, waving it around and trying to find the best connection spot.
I was shocked when I finally managed to get a one-way 90Mbps while holding the broom and thought, this might actually work!
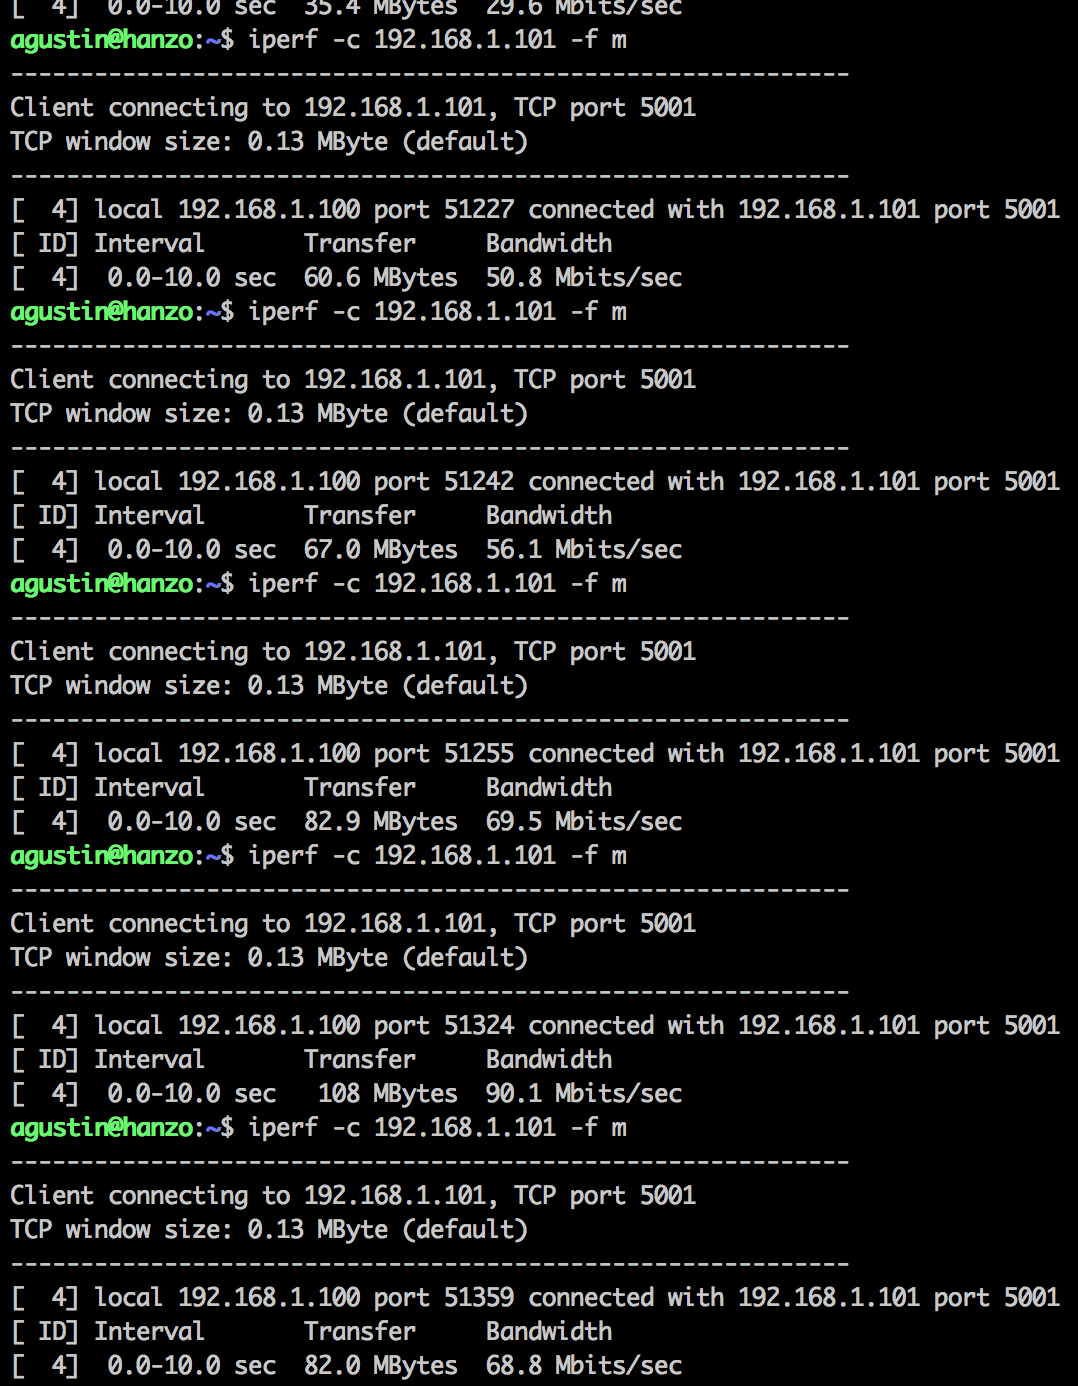
iperf results
I used iperf to test the connection. It runs in a server/client model and I ran the server at the “FTTH” point and then the client at the “No INET” point.
Here are the iperf results:
Choosing Hardware
I decided to commit to the Point-to-Point link as the solution to my internet woes. The next step was figuring out the right pair of antennas to get the most out of this link.
Product
NSM5
NSM5 loco
NanoBeam M5
LiteBeam M5
Gain
16 dBi
13 dBi
16 dBi
23 dBi
Max Pow
8W
5.5W
6W
4W
Wind Survival
-
-
200 Km/h
200 Km/h
Weight
0.4 Kg
0.18 Kg
0.320 Kg
0.750 Kg
CPU
MIPS 24KC (400 Mhz)
MIPS 24KC (400 Mhz)
MIPS 74KC (560 Mhz)
MIPS 74K
Mem
32 MB (SDRAM)
32 MB (SDRAM)
64 MB (DDR2)
64 MB
Network
2 x 10/100 eth0
1 x 10/100 eth0
1 x 10/100 eth0
1 x 10/100 eth0
54M -> -75dBm (802.11a)
54M -> -75dBm (802.11b/g)
54M -> -75dBm (802.11a)
54M -> -84dBm (802.11a)
Amazon Price
usd 88
usd 62
usd 69
usd 55
Part Name
NSM5
LOCOM5
NBE-M5-16
LBE-M5-23
MIMO 2x2
SISO 1x1
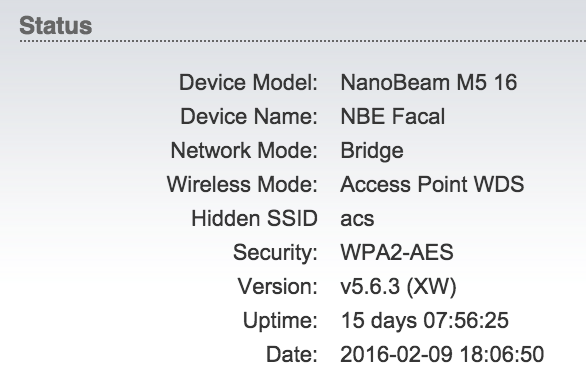
I picked the NanoBeam, one of the newest products on the Airmax line. I chose it because it was a MIMO 2x2 radio (compared to the LiteBeam) and had a nice antenna gain. It also featured a newer CPU, DDR2 memory, and it was also pretty light and had very high wind survivability.
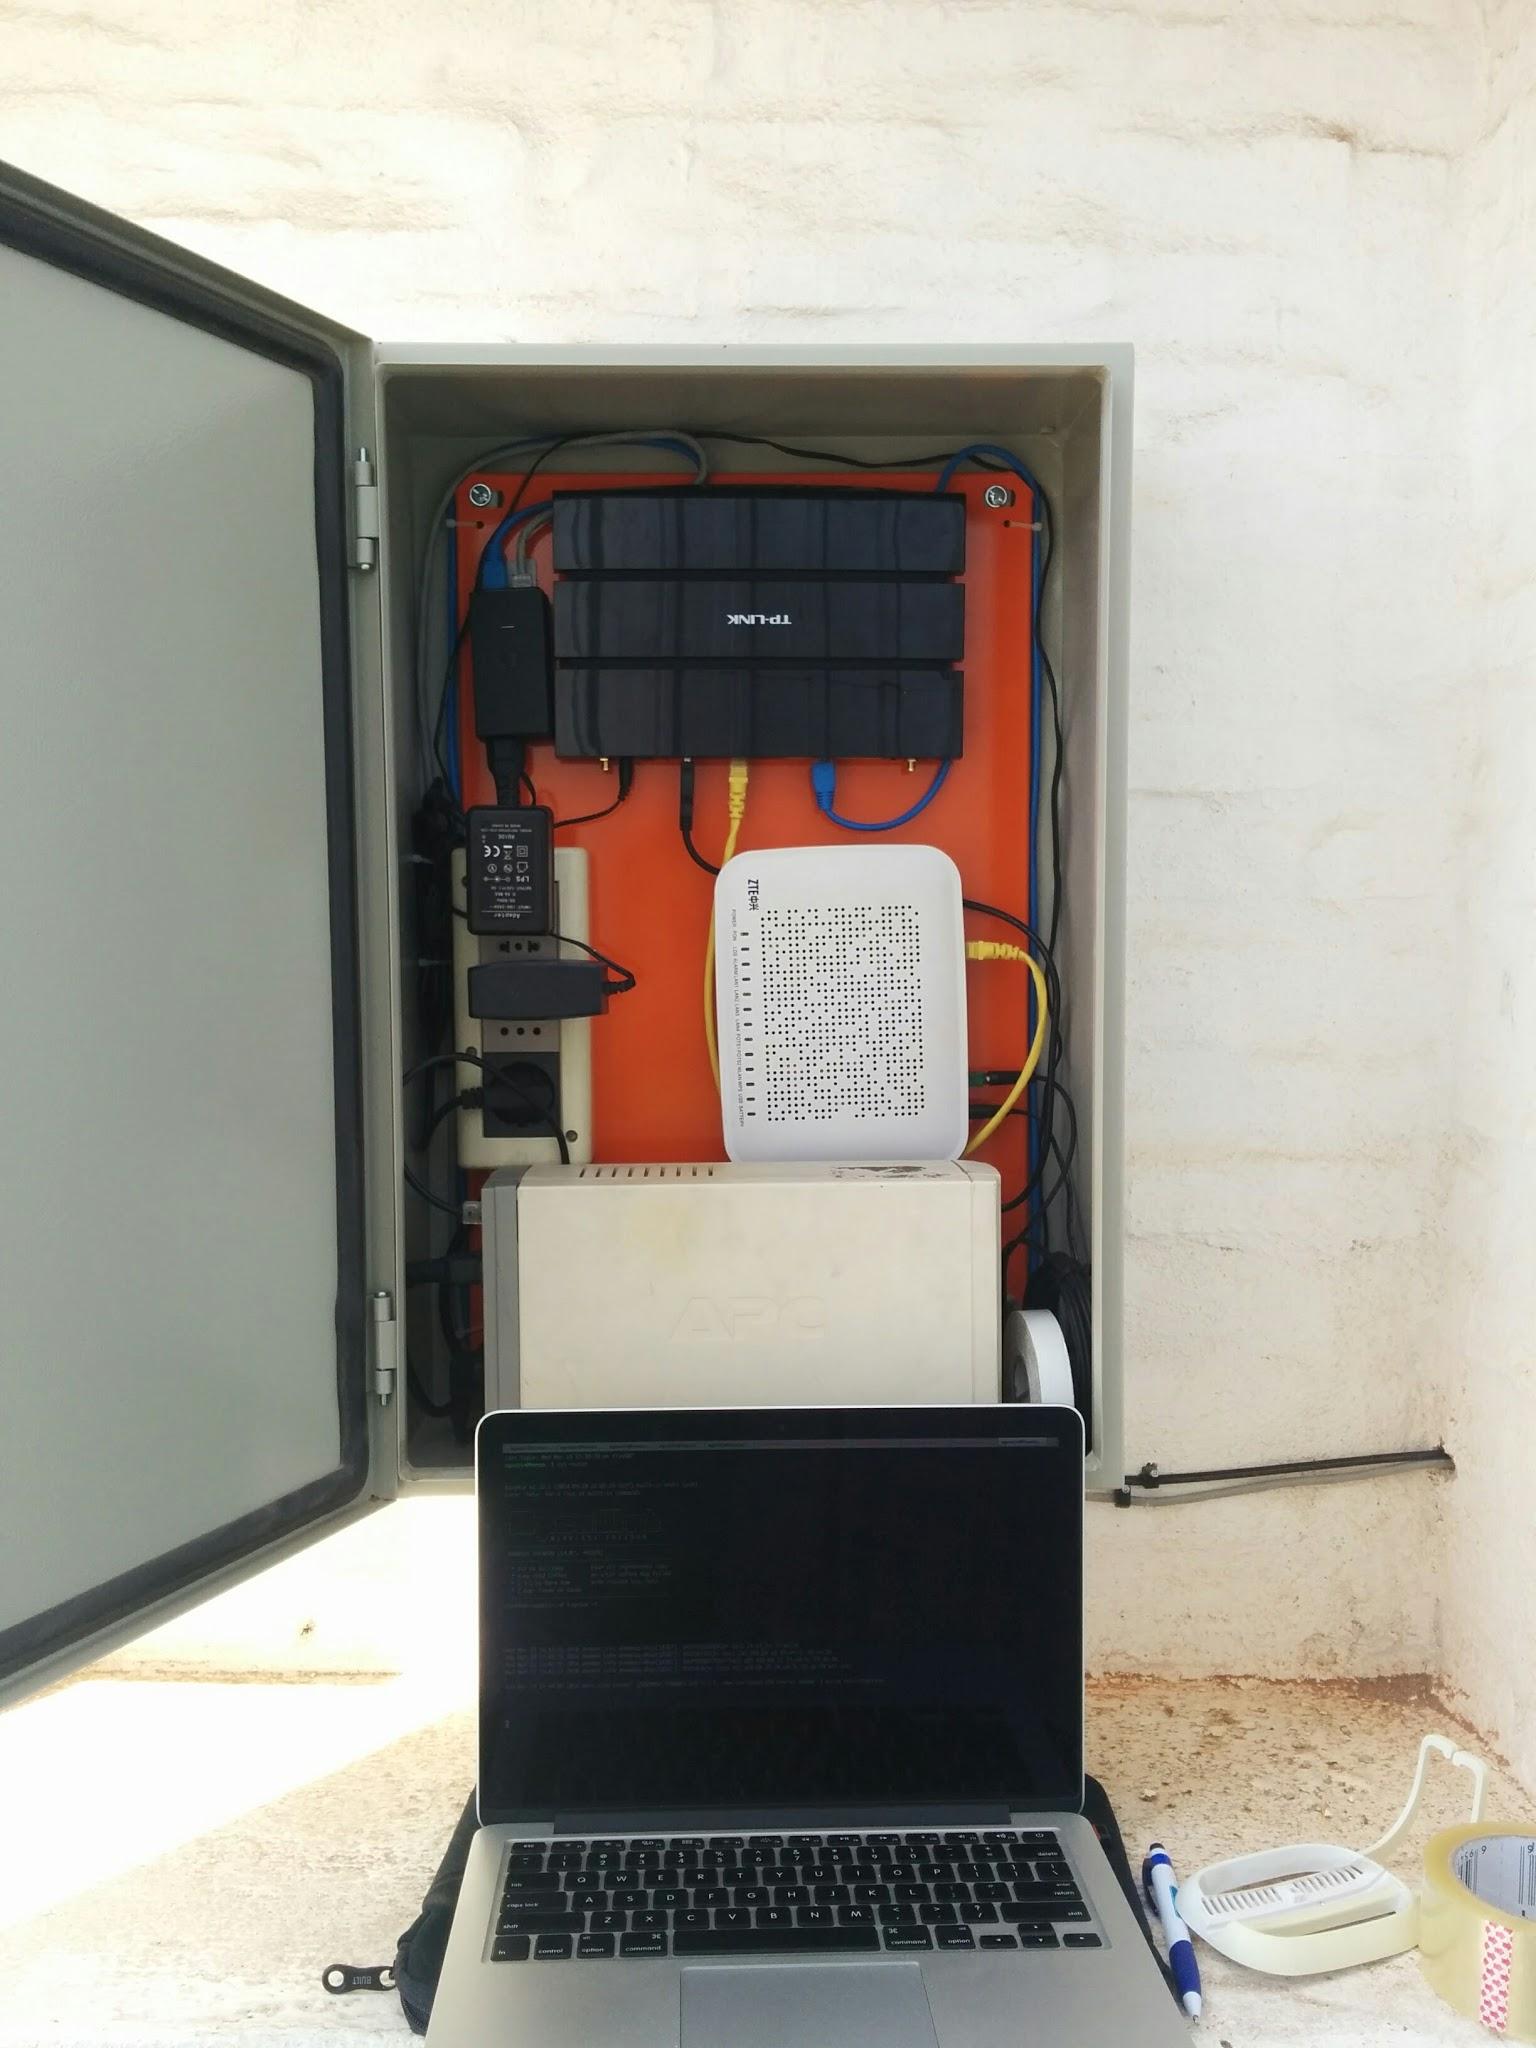
Installing the link
List of Materials:
- 2 x NanoBeam M5 ($139 + $40 [courier] )
- 1 x APC UPS (used at home)
- 1 x ZTE F660 ONT (provided by ISP)
- 1 x watertight enclosure ($60)
- 50m of Cat6 STP (~ $35)
- 1 x TP Link WDR 3600 (with OpenWRT v14.07 "Barrier Breaker" - this was my home router)
- apcupsd (to monitor the UPS)
Total Cost: $274
I enrolled in a basic fiber plan at the "FTTH" point (30/4 Mbps) for $25 a month.
Wrap Up
I’ve yet to experience any lags or disconnection issues since I set up the Point-to-Point FTTH link. I’ve even run Netflix and Spotify at the same time to test the connection, all while downloading several things on the computer. If a house is built right in the path of the signal, I’ll need to increase the height if I want the link to continue operating. But, so far so good!
SUCCESS!
Just goes to show what a little perseverance can do when paired with a broomstick and borrowed binoculars.
Technical details
For those who are especially interested in the subject, here are the nitty gritty details on signal strength along with other information:
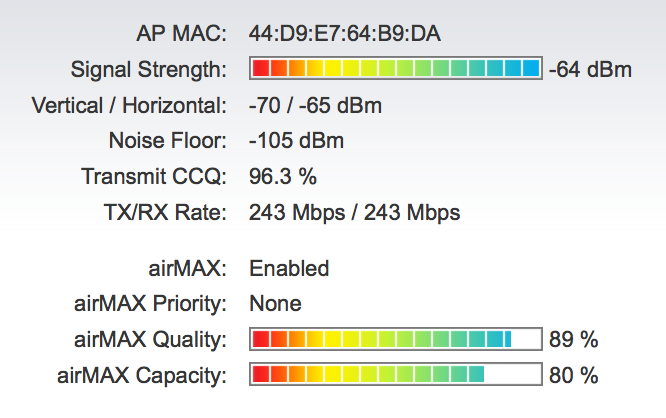
After performing a full duplex "Network Speed Test" with NanoBeam's own speed test tool:
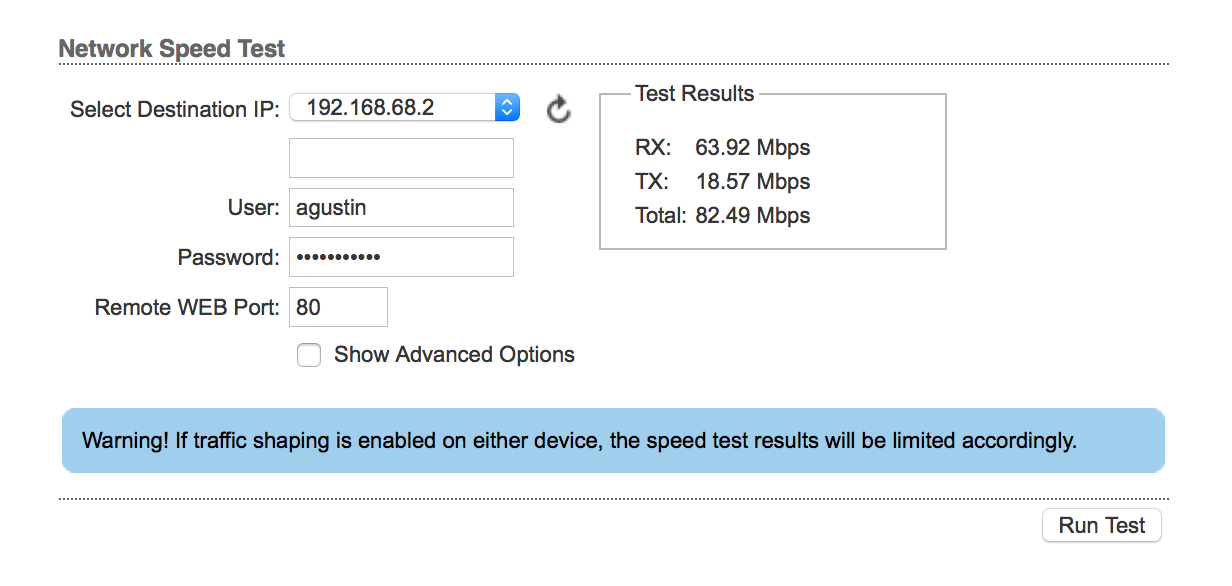 Same test, but with one-way only:

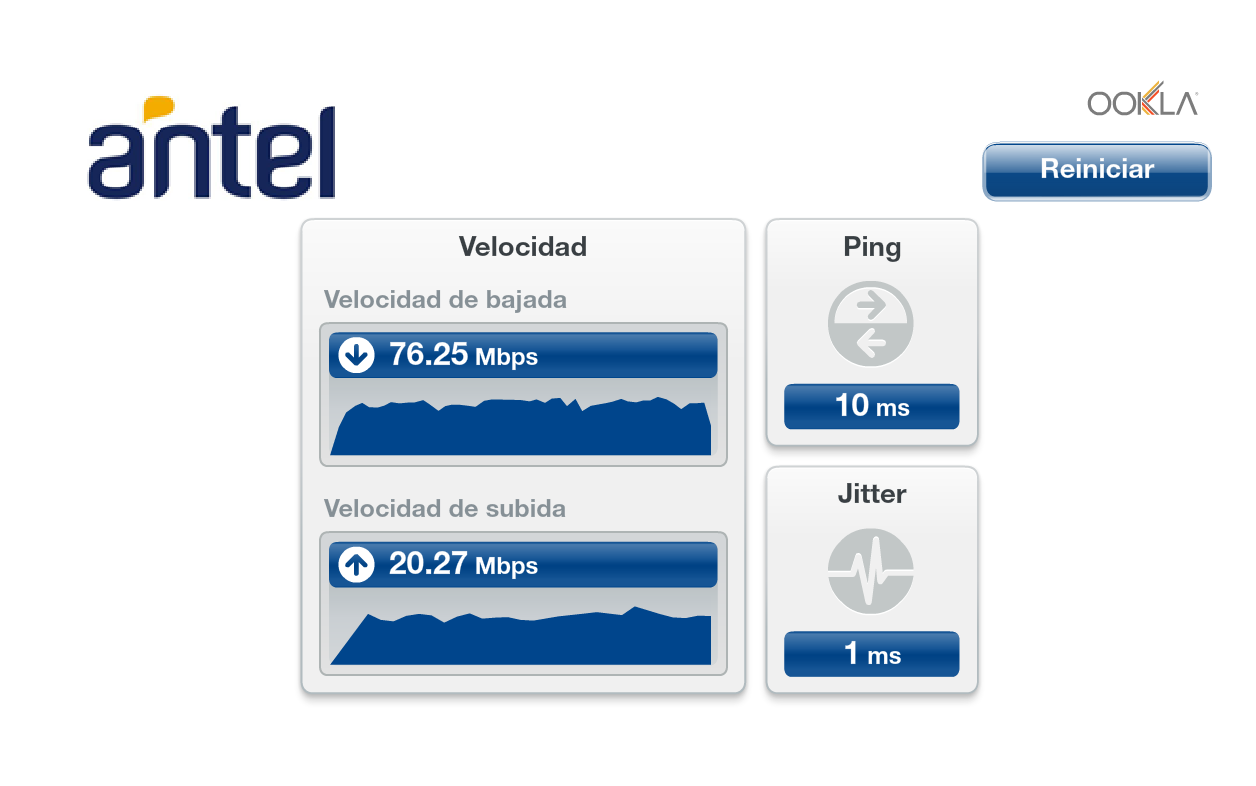
ISP speed test:


_HFpro5d6k3.png&w=256&q=75)
_E4PyVpfAxa.png&w=256&q=75)


-(1).png&w=1920&q=75)
-(1)_VZGHqxCgXV.png&w=1920&q=75)
